JBL Charge 3 Button Combinations: The Most Important Shortcuts
Introduction
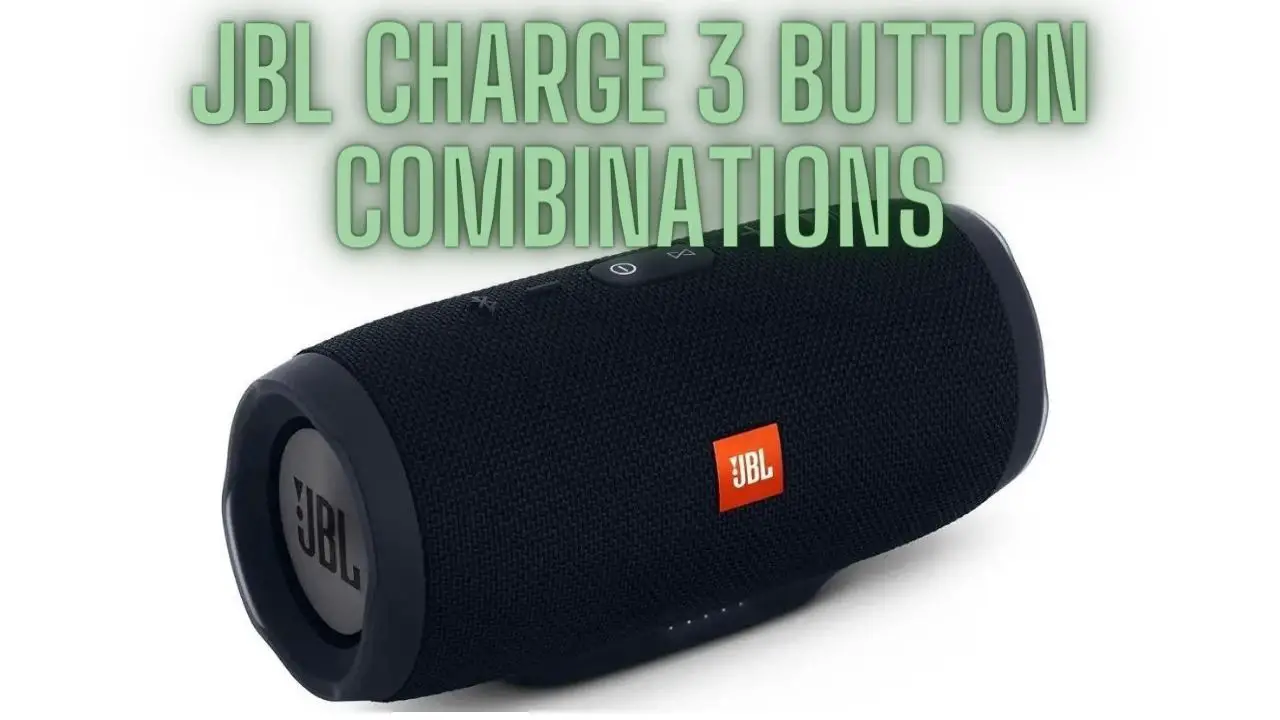
The JBL Charge 3 portable Bluetooth speaker is renowned for its powerful sound, durable design, and convenient features. One of its key aspects is its intuitive button controls, allowing users to easily navigate through various functions and settings. In this guide, we will explore the button combinations of the JBL Charge 3, providing you with comprehensive instructions on how to utilize its features effectively.
Whether you’re powering on the speaker, adjusting volume levels, controlling playback, or activating speakerphone mode, understanding the button combinations will enhance your overall experience with the JBL Charge 3. Join us as we delve into the versatile functionality of this popular portable speaker, making every interaction with it a seamless and enjoyable one.
Power On/Off
To power on or off the JBL Charge 3 portable Bluetooth speaker, follow these steps:
Powering On:
- Locate the power button on the JBL Charge 3. It is usually found on the top or front of the speaker, depending on its orientation.
- Press and hold the power button for a few seconds until you see the LED indicator lights illuminate or hear a startup sound. This indicates that the speaker has powered on successfully.
- Once powered on, the JBL Charge 3 will automatically enter pairing mode if it has not been previously paired with a device. You can now proceed to pair it with your Bluetooth-enabled device.
Powering Off:
- Locate the power button on the JBL Charge 3 speaker.
- Press and hold the power button for a few seconds until you see the LED indicator lights turn off or hear a shutdown sound. This indicates that the speaker has powered off successfully.
- Once powered off, the JBL Charge 3 will disconnect from any connected devices and enter a standby state.
By following these simple steps, you can easily power on or off your JBL Charge 3 speaker as needed, ensuring optimal battery life and convenience in use.
Bluetooth Pairing
Pairing your JBL Charge 3 with a Bluetooth-enabled device allows you to wirelessly stream audio from your device to the speaker. Here’s how to pair the JBL Charge 3 with your device:
- Power On the JBL Charge 3:
- Press and hold the power button on the JBL Charge 3 until you see the LED indicator lights illuminate, indicating that the speaker is powered on.
- Enter Pairing Mode:
- If the JBL Charge 3 is not already in pairing mode, press and hold the Bluetooth button (located next to the power button) for about 3 seconds. The Bluetooth button is typically marked with a Bluetooth symbol or the word “Bluetooth”.
- Locate the JBL Charge 3 on Your Device:
- On your Bluetooth-enabled device (such as a smartphone, tablet, or computer), navigate to the Bluetooth settings menu.
- Look for the JBL Charge 3 in the list of available Bluetooth devices. It should appear as “JBL Charge 3” or a similar name.
- Pair the Devices:
- Select the JBL Charge 3 from the list of available Bluetooth devices on your device’s Bluetooth settings menu.
- Follow any on-screen prompts to complete the pairing process. You may be asked to confirm the pairing code displayed on your device and the speaker.
- Confirmation:
- Once paired successfully, you should hear a confirmation sound from the JBL Charge 3, and the Bluetooth indicator light on the speaker will stop flashing, indicating a successful connection.
- Test the Connection:
- Play some audio on your device to ensure that the sound is coming through the JBL Charge 3 speaker. You may need to adjust the volume on both your device and the speaker.
- Additional Devices:
- You can pair the JBL Charge 3 with multiple Bluetooth-enabled devices. Simply repeat the pairing process with each additional device you wish to connect.
By following these steps, you can easily pair your JBL Charge 3 with your Bluetooth-enabled device and enjoy wireless audio streaming with ease. If you encounter any issues during the pairing process, ensure that both the speaker and your device are within range and that Bluetooth is enabled on both devices.
Volume Control
Controlling the volume on your JBL Charge 3 speaker is simple and straightforward. Here’s how you can adjust the volume:
- Volume Up:
- To increase the volume, press the “Volume Up” button on the JBL Charge 3. This button is usually marked with a “+”, “+” symbol, or an upward arrow.
- Volume Down:
- To decrease the volume, press the “Volume Down” button on the JBL Charge 3. This button is typically marked with a “-“, “-” symbol, or a downward arrow.
- Gradual Adjustment:
- Press and hold the volume buttons for continuous volume adjustment. The volume will gradually increase or decrease as you hold down the buttons.
- Audible Feedback:
- As you adjust the volume, the JBL Charge 3 will provide audible feedback to indicate the current volume level. You will hear a tone or beep for each volume increment or decrement.
- Check LED Indicators:
- The LED indicator lights on the JBL Charge 3 may also provide visual feedback of the current volume level. Some models have LED indicators that change color or brightness based on the volume setting.
- Adjusting Device Volume:
- Additionally, you can adjust the volume of the audio source (e.g., your smartphone, tablet, or computer) to further fine-tune the volume level. Ensure that both the speaker volume and device volume are set to your desired level.
By using the volume control buttons on the JBL Charge 3 speaker, you can easily adjust the volume to your preferred level for an enjoyable listening experience. Whether you’re listening to music, watching videos, or making calls, precise volume control ensures that you can set the audio level just right.
Play/Pause and Track Control
The JBL Charge 3 speaker allows you to control playback and navigate tracks directly from the device. Here’s how you can use the play/pause button and track navigation buttons:
- Play/Pause Button:
- Press the play/pause button on the JBL Charge 3 to toggle between playing and pausing audio playback. This button is usually marked with a “play” symbol (▶️) or a “pause” symbol (⏸️).
- Track Navigation Buttons:
- Some models of the JBL Charge 3 feature track navigation buttons that allow you to skip tracks forward or backward.
- To skip to the next track, press the “Next Track” button. This button is typically marked with a “forward” or “skip forward” symbol (⏭️).
- To skip to the previous track, press the “Previous Track” button. This button is usually marked with a “backward” or “skip backward” symbol (⏮️).
- Hold for Fast Forward/Rewind:
- Press and hold the “Next Track” or “Previous Track” button to fast forward or rewind within a track, respectively. Release the button to resume normal playback.
- Compatibility with Audio Apps:
- The play/pause and track navigation buttons on the JBL Charge 3 are compatible with most audio apps and media players on your connected device, such as music streaming apps, podcast apps, and video players.
- Voice Assistants:
- Some models of the JBL Charge 3 allow you to activate voice assistants, such as Siri or Google Assistant, by pressing and holding the play/pause button. This feature enables hands-free control of your device and access to voice commands.
By using the play/pause button and track navigation buttons on the JBL Charge 3 speaker, you can conveniently control playback and navigate tracks without having to interact directly with your connected device. Whether you’re listening to music, podcasts, or other audio content, these buttons provide easy access to essential playback functions.
Speakerphone Functionality
The JBL Charge 3 speaker offers convenient speakerphone functionality, allowing you to take hands-free calls directly from the speaker. Here’s how to use the speakerphone feature:
- Answering Calls:
- When you receive an incoming call on your smartphone or connected device, the JBL Charge 3 will emit a ringing tone.
- To answer the call using the speakerphone, simply press the Bluetooth or play/pause button on the JBL Charge 3. This will answer the call and activate the speakerphone mode.
- Ending Calls:
- To end a call while using the speakerphone, press the Bluetooth or play/pause button again. This will disconnect the call and return the speaker to playback mode.
- Adjusting Call Volume:
- During a call, you can adjust the call volume directly from the JBL Charge 3 speaker using the volume up and volume down buttons. This allows you to increase or decrease the volume of the caller’s voice as needed.
- Muting the Microphone:
- Some models of the JBL Charge 3 feature a microphone mute button that allows you to mute the microphone during a call. This button is usually marked with a microphone symbol (🎙️) and can be pressed to toggle the microphone mute status.
- Voice Assistants:
- Some models of the JBL Charge 3 allow you to activate voice assistants, such as Siri or Google Assistant, during a call. Simply press and hold the Bluetooth or play/pause button to activate the voice assistant and issue voice commands hands-free.
- Clear Communication:
- The built-in microphone on the JBL Charge 3 ensures clear communication during calls, allowing you to have conversations with excellent audio quality.
- Multiple Call Management:
- If you receive a second incoming call while on a call, you can switch between calls or merge calls using your smartphone’s call management features. The JBL Charge 3 will automatically switch to the active call.
By utilizing the speakerphone functionality of the JBL Charge 3, you can enjoy hands-free calling with clear audio quality, making it convenient for conference calls, group conversations, or when you’re on the go. Whether you’re working from home, chatting with friends, or participating in virtual meetings, the speakerphone feature enhances your communication experience.
JBL Connect+
JBL Connect+ is a feature that allows you to wirelessly link multiple JBL Connect+ compatible speakers together to amplify your listening experience. Here’s how to use JBL Connect+ with your JBL Charge 3 speaker:
- Check Compatibility:
- Ensure that your JBL Charge 3 speaker is equipped with JBL Connect+ functionality. This feature allows the speaker to wirelessly connect with other JBL Connect+ compatible speakers.
- Pairing with Additional Speakers:
- To pair your JBL Charge 3 with other JBL Connect+ compatible speakers, make sure they are all powered on and in pairing mode.
- Press and hold the JBL Connect+ button on your JBL Charge 3 until you hear a chime or see the indicator lights flash.
- On the other JBL Connect+ compatible speakers, press the JBL Connect+ button to put them in pairing mode.
- Once paired, the speakers will automatically sync and play audio simultaneously, creating a stereo sound experience or expanding the sound coverage area.
- Stereo Pairing:
- If you have two JBL Charge 3 speakers or other JBL Connect+ compatible speakers, you can create a stereo pair for immersive stereo sound.
- Pair the two speakers as described above, ensuring that one speaker is designated as the left channel and the other as the right channel.
- When paired in stereo mode, one speaker will play the left audio channel, while the other speaker will play the right audio channel, resulting in a wider soundstage.
- Party Mode:
- In Party Mode, multiple JBL Connect+ compatible speakers can be connected to play the same audio simultaneously.
- Pair all the speakers as described above, and they will all play the same audio in sync, creating a synchronized sound experience for larger gatherings or parties.
- Additional Controls:
- Some models of the JBL Charge 3 feature dedicated JBL Connect+ buttons for easy access to the pairing and synchronization process. Refer to your speaker’s user manual for specific instructions on how to use JBL Connect+.
By utilizing JBL Connect+ with your JBL Charge 3 speaker, you can create a more immersive listening experience by wirelessly linking multiple speakers together. Whether you’re hosting a party, enjoying outdoor activities, or simply want to fill your space with music, JBL Connect+ enhances the versatility and functionality of your JBL Charge 3 speaker.
Battery Level Indicator
The JBL Charge 3 speaker features a battery level indicator that allows you to monitor the remaining battery life of the speaker. Here’s how to interpret the battery level indicator:
- LED Indicator Lights:
- The JBL Charge 3 speaker is equipped with LED indicator lights that provide visual feedback of the battery level.
- These indicator lights are typically located near the power button or on the front panel of the speaker.
- Battery Status Colors:
- The LED indicator lights display different colors to indicate the battery status:
- Solid White: When the LED indicator lights are solid white, it indicates that the battery is fully charged.
- Flashing White: A flashing white LED indicates that the battery is charging.
- Solid Red: A solid red LED indicates that the battery is low and needs to be recharged soon.
- Flashing Red: A flashing red LED indicates that the battery is critically low and requires immediate recharging.
- The LED indicator lights display different colors to indicate the battery status:
- Charging Status:
- When you connect the JBL Charge 3 to a power source for charging, the LED indicator lights will display the charging status:
- Flashing White: The LED indicator lights will flash white while the battery is charging.
- Solid White: Once the battery is fully charged, the LED indicator lights will remain solid white.
- When you connect the JBL Charge 3 to a power source for charging, the LED indicator lights will display the charging status:
- Checking Battery Level:
- To check the current battery level of the JBL Charge 3, you can press the power button briefly.
- The LED indicator lights will illuminate to indicate the current battery status (solid white for fully charged, solid red for low battery, etc.).
- To check the current battery level of the JBL Charge 3, you can press the power button briefly.
- Automatic Power Off:
- The JBL Charge 3 speaker may automatically power off when the battery level is critically low to prevent damage to the battery.
By monitoring the battery level indicator on the JBL Charge 3 speaker, you can ensure that the speaker is adequately charged for your listening needs. Charging the speaker when the battery is low or critically low will help maintain its performance and prolong its lifespan.
Resetting the Speaker
If you encounter issues with your JBL Charge 3 speaker or need to clear its paired devices, you can perform a reset. Here’s how to reset the JBL Charge 3:
- Power Off the Speaker:
- Ensure that the JBL Charge 3 speaker is powered off. If it’s currently on, press and hold the power button until the LED indicator lights turn off, indicating that the speaker is powered off.
- Reset Button Location:
- Locate the reset button on your JBL Charge 3 speaker. The reset button is typically found near the charging port and may be recessed to prevent accidental activation.
- Use a Tool to Press Reset Button:
- Using a small tool such as a paperclip or a pen tip, press and hold the reset button on the JBL Charge 3 for about 5 seconds. You should feel a slight click when the button is depressed.
- Release the Reset Button:
- After holding the reset button for 5 seconds, release it. The LED indicator lights on the JBL Charge 3 may flash briefly to indicate that the reset process has been initiated.
- Power On the Speaker:
- Press and hold the power button on the JBL Charge 3 to power it on. The speaker will start up as usual, and you can proceed to pair it with your devices or use it as desired.
- Re-pair Devices (if necessary):
- If you reset the JBL Charge 3 to clear its paired devices, you’ll need to re-pair it with your Bluetooth-enabled devices. Follow the pairing instructions provided earlier in this guide to connect the speaker to your devices.
By performing a reset on the JBL Charge 3 speaker, you can resolve certain issues or clear its paired devices to start fresh. This process restores the speaker to its default settings and can help address connectivity issues or other performance issues you may encounter.
Firmware Updates
Keeping your JBL Charge 3 speaker up-to-date with the latest firmware ensures optimal performance and compatibility with your devices. Here’s how to check for and install firmware updates:
- Download JBL Connect App:
- If you haven’t already, download and install the JBL Connect app on your smartphone or tablet. The app is available for both iOS and Android devices and can be found in the respective app stores.
- Launch JBL Connect App:
- Open the JBL Connect app on your device.
- Connect JBL Charge 3:
- Ensure that your JBL Charge 3 speaker is powered on and within Bluetooth range of your device.
- Use the JBL Connect app to connect to your JBL Charge 3 speaker.
- Check for Updates:
- Once connected, navigate to the settings or options menu within the JBL Connect app.
- Look for an option to “Check for Updates” or “Firmware Updates.” Select this option to check if there are any available updates for your JBL Charge 3 speaker.
- Download and Install Updates:
- If an update is available, follow the on-screen prompts to download and install the firmware update to your JBL Charge 3 speaker.
- Make sure that your device remains connected to the speaker and within Bluetooth range during the update process.
- Wait for Installation:
- The firmware update process may take several minutes to complete. Be patient and wait for the update to install fully.
- Restart the Speaker:
- Once the firmware update is complete, restart your JBL Charge 3 speaker by powering it off and then back on again. This ensures that the update is applied correctly.
- Verify Update:
- After restarting the speaker, check the firmware version in the settings or options menu of the JBL Connect app to verify that the update was successful.
By regularly checking for firmware updates and keeping your JBL Charge 3 speaker up-to-date, you can ensure that it remains optimized for performance and compatibility with your devices. Firmware updates may include bug fixes, performance enhancements, and new features, enhancing your overall listening experience with the speaker.
Troubleshooting
If you encounter any issues with your JBL Charge 3 speaker, here are some troubleshooting steps you can try:
- Power Cycle the Speaker:
- Turn off the JBL Charge 3 speaker and then turn it back on. Sometimes a simple power cycle can resolve minor issues.
- Check Battery Level:
- Ensure that the battery of the JBL Charge 3 is sufficiently charged. If the battery is low, charge the speaker using the included charging cable and adapter.
- Ensure Bluetooth Connection:
- If you’re experiencing connectivity issues, ensure that Bluetooth is enabled on both the speaker and the device you’re trying to connect it to. Also, make sure the speaker is in pairing mode.
- Forget and Re-pair Devices:
- If you’re having trouble connecting the JBL Charge 3 to your device, try forgetting the speaker from your device’s Bluetooth settings and then re-pairing them.
- Update Firmware:
- Check for firmware updates for the JBL Charge 3 using the JBL Connect app, and install any available updates. Firmware updates can address known issues and improve performance.
- Reset the Speaker:
- Perform a factory reset on the JBL Charge 3 by pressing and holding the reset button for about 5 seconds. This will restore the speaker to its default settings.
- Check Audio Source:
- Make sure the audio source (e.g., smartphone, tablet, or computer) is playing audio and that the volume is turned up.
- Check Audio Cable (if applicable):
- If you’re using a wired connection, ensure that the audio cable is securely connected to both the JBL Charge 3 and the audio source.
- Test with Another Device:
- Try connecting the JBL Charge 3 to a different Bluetooth-enabled device to see if the issue persists. This can help determine if the problem is with the speaker or the original device.
- Contact Support:
- If the issue persists after trying the above steps, contact JBL customer support for further assistance. They may be able to provide additional troubleshooting steps or arrange for repairs if necessary.
By following these troubleshooting steps, you can address common issues with your JBL Charge 3 speaker and ensure a smooth and enjoyable listening experience.
Conclusion
Mastering these button combinations for your JBL Charge 3 will greatly enhance your experience with this portable Bluetooth speaker. Whether you want to change tracks, adjust the volume, answer calls, or activate your phone’s voice assistant, these shortcuts make it easy to control your music and stay connected while on the go. Enjoy your music with the convenience and versatility of the JBL Charge 3.

