Can You Weld Aluminum? How to Weld Aluminum
Abstract:
Aluminum welding presents unique challenges and opportunities for welders due to the metal’s properties and characteristics. In this comprehensive guide, we delve into the world of aluminum welding, exploring its techniques, challenges, applications, and best practices. From understanding the properties of aluminum to mastering the welding process, this article aims to provide readers with a deep understanding of aluminum welding and its significance in various industries.
Introduction:
Aluminum is a versatile metal widely used in industries such as aerospace, automotive, marine, construction, and manufacturing due to its lightweight, corrosion resistance, and excellent thermal conductivity. However, welding aluminum presents distinct challenges compared to welding steel or other metals due to its lower melting point, high thermal conductivity, and susceptibility to heat-affected zone (HAZ) cracking. Despite these challenges, aluminum welding is essential for fabricating complex structures and components in modern engineering applications.
Properties of Aluminum:
Before diving into aluminum welding techniques, it’s essential to understand the properties that make aluminum unique:
- Lightweight: Aluminum is significantly lighter than steel, making it ideal for applications where weight reduction is critical, such as aerospace and automotive industries.
- Corrosion Resistance: Aluminum forms a protective oxide layer on its surface, providing excellent corrosion resistance in various environments.
- High Thermal Conductivity: Aluminum conducts heat rapidly, which can pose challenges during welding as it requires higher heat inputs and faster travel speeds.
- Low Melting Point: Aluminum has a lower melting point compared to steel, requiring specialized welding techniques and equipment to achieve proper fusion without overheating the metal.
- Ductility: Aluminum is highly ductile and prone to distortion and warping during welding, requiring careful control of heat input and distortion mitigation techniques.
Techniques for Welding Aluminum:
Several welding processes are commonly used for aluminum, each with its advantages and challenges:
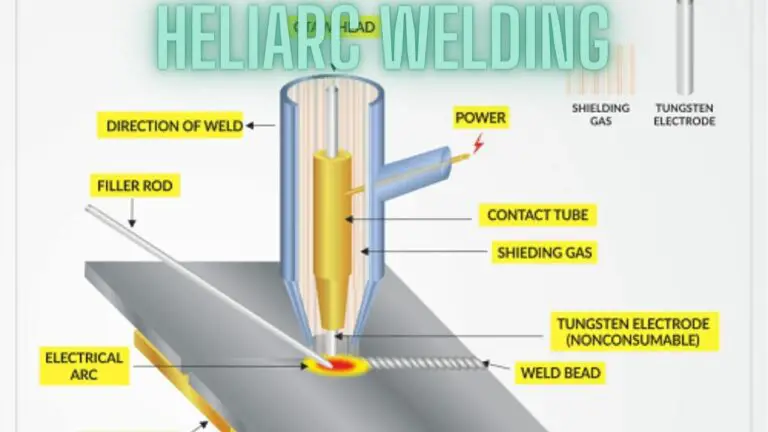
- Gas Tungsten Arc Welding (GTAW or TIG): TIG welding is the preferred method for welding aluminum due to its precise control, clean welds, and minimal spatter. It involves using a non-consumable tungsten electrode and shielding gas (typically argon) to create an arc between the electrode and the workpiece.
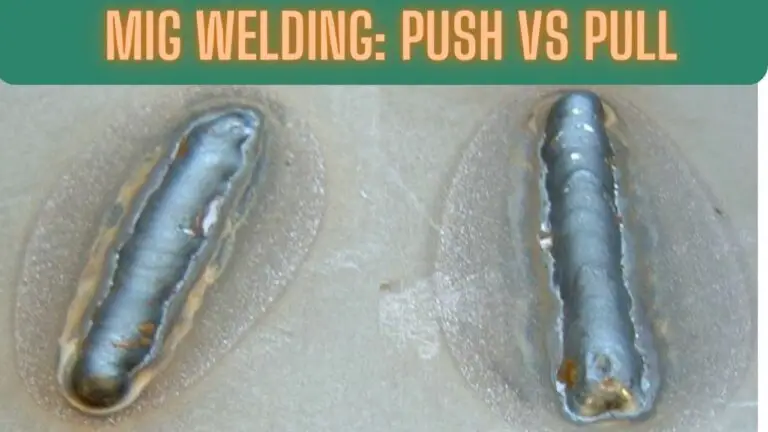
- Gas Metal Arc Welding (GMAW or MIG): MIG welding is suitable for aluminum welding, especially in industrial applications requiring high productivity. It utilizes a consumable electrode wire and a shielding gas (argon or argon-helium mix) to create an arc and deposit filler metal into the weld pool.
- Flux-Cored Arc Welding (FCAW): FCAW can be used for aluminum welding with specialized flux-cored wires designed for this purpose. It offers higher deposition rates and deeper penetration compared to TIG or MIG welding but may produce more spatter and require additional cleaning.
- Plasma Arc Welding (PAW): PAW is a high-precision welding process suitable for thin aluminum sheets and intricate weldments. It utilizes a constricted plasma arc and shielding gas to achieve narrow, precise welds with minimal distortion.
Challenges in Aluminum Welding:
Aluminum welding presents several challenges that welders must overcome to produce high-quality welds:
- High Thermal Conductivity: Aluminum’s high thermal conductivity requires careful control of heat input and travel speed to prevent overheating and distortion.
- Oxide Formation: Aluminum quickly forms oxide layers when exposed to air, necessitating proper cleaning and surface preparation before welding to ensure adequate fusion.
- Hot Cracking: Aluminum is prone to hot cracking, especially in thick sections or when welded with improper techniques. Preheating, post-weld heat treatment, and filler metal selection can help mitigate this issue.
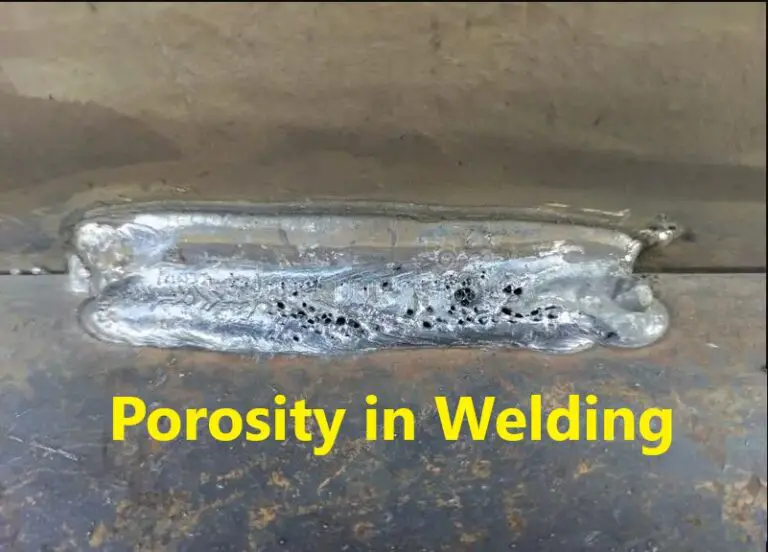
- Porosity: Aluminum is susceptible to gas porosity due to hydrogen absorption from moisture or contaminants. Proper shielding gas selection, cleanliness, and welding techniques are essential to minimize porosity.
- Welding Fume Concerns: Aluminum welding produces fumes containing aluminum oxide particles, which can pose health hazards if inhaled. Adequate ventilation and personal protective equipment (PPE) are necessary to protect welders from exposure.
Best Practices for Aluminum Welding:
To achieve successful aluminum welds, welders should adhere to the following best practices:
- Cleanliness: Thoroughly clean the aluminum surfaces to remove oxide layers, oils, grease, and other contaminants before welding to ensure proper fusion.
- Preheating and Post-Weld Heat Treatment: Preheating thick aluminum sections and applying post-weld heat treatment can help reduce residual stresses and minimize the risk of cracking.
- Proper Shielding Gas: Use high-purity argon or argon-helium mixtures as shielding gas to provide adequate coverage and protect the weld pool from atmospheric contamination.
- Welding Technique: Employ proper welding techniques such as maintaining a consistent travel speed, using the correct torch angle and electrode extension, and employing back purging for critical applications.
- Filler Metal Selection: Choose filler metals compatible with the base metal and welding process, ensuring good wetting and mechanical properties in the finished weld.
- Distortion Control: Implement distortion control techniques such as tack welding, clamping, and jigging to minimize distortion and maintain dimensional accuracy in welded assemblies.
Applications of Aluminum Welding:
Aluminum welding finds extensive applications across various industries, including:
- Aerospace: Welded aluminum structures are used in aircraft fuselages, wings, empennages, and other components due to their lightweight and high strength-to-weight ratio.
- Automotive: Aluminum welding is employed in the fabrication of automotive components such as body panels, chassis, engine blocks, and heat exchangers to reduce vehicle weight and improve fuel efficiency.
- Marine: Welded aluminum hulls, decks, superstructures, and marine fittings are common in shipbuilding and boat manufacturing due to aluminum’s corrosion resistance and durability in marine environments.
- Construction: Aluminum welding is used in architectural applications such as curtain walls, window frames, structural supports, and roofing systems due to its aesthetic appeal, durability, and ease of fabrication.
- Electronics: Welded aluminum enclosures, heat sinks, and electronic housings are essential in electronic manufacturing for dissipating heat and providing electromagnetic shielding.
Can You Weld Aluminum FAQs
- Can you weld aluminum with a MIG welder?
- Yes, aluminum can be welded using a MIG (Metal Inert Gas) welding process, also known as gas metal arc welding (GMAW). However, welding aluminum with MIG requires specialized equipment, such as a spool gun or push-pull gun, to feed the soft aluminum wire without tangling or bird nesting.
- What type of gas is used for welding aluminum?
- The most common shielding gas used for welding aluminum is argon. Argon provides excellent protection for the weld pool and helps prevent oxidation during the welding process. In some cases, helium may be added to argon to improve heat penetration and increase welding speed.
- Can you weld aluminum with a stick welder?
- While it is possible to weld aluminum with a stick welder (Shielded Metal Arc Welding or SMAW), it is not commonly done due to the challenges associated with the process. SMAW typically requires a flux-coated electrode, which may not provide adequate shielding for aluminum welding. Additionally, aluminum’s high thermal conductivity makes it more challenging to weld with stick electrodes compared to other welding processes.
- What is TIG welding, and can it be used for welding aluminum?
- TIG (Tungsten Inert Gas) welding, also known as gas tungsten arc welding (GTAW), is a commonly used process for welding aluminum. TIG welding is well-suited for aluminum because it provides precise control over the welding parameters, produces clean, high-quality welds, and allows for welding thinner materials.
- What are the challenges of welding aluminum?
- Welding aluminum presents several challenges, including its high thermal conductivity, susceptibility to oxidation, and tendency to distort and warp during welding. Additionally, aluminum is more prone to cracking and porosity compared to other metals, requiring careful control of welding parameters and techniques.
- What type of welding rod is used for aluminum?
- Aluminum welding typically uses a filler metal that matches the composition of the base metal or an alloy that provides similar mechanical properties. Common filler metals for welding aluminum include ER4043 and ER5356, which are available in various diameters for use with different welding processes.
- What precautions should be taken when welding aluminum?
- When welding aluminum, it is essential to take precautions to ensure successful welds and maintain safety. Some precautions include proper surface preparation to remove oxide layers, using the correct welding technique and parameters, selecting the appropriate filler metal, and ensuring adequate ventilation to prevent exposure to welding fumes.
- Can aluminum be welded to steel?
- Yes, aluminum can be welded to steel using specialized welding techniques such as friction welding, explosion welding, or using intermediate materials such as aluminum bronze or zinc-based alloys as transition layers. However, welding aluminum directly to steel using traditional fusion welding processes is challenging due to the significant differences in their melting points and metallurgical properties.
- What are some common applications of aluminum welding?
- Aluminum welding is used in various industries and applications, including aerospace, automotive, marine, construction, electronics, and manufacturing. Common applications include fabricating aircraft components, automotive body panels, marine structures, architectural elements, heat exchangers, and electronic enclosures.
- What factors should be considered when welding aluminum?
- Factors to consider when welding aluminum include the type of welding process, base metal thickness and composition, joint design, welding position, shielding gas selection, filler metal choice, and pre- and post-weld heat treatment requirements. Additionally, proper cleaning and surface preparation are crucial for successful aluminum welding.
These FAQs provide valuable insights into the challenges, techniques, and considerations involved in welding aluminum, helping welders understand the intricacies of working with this versatile metal.
Conclusion:
Aluminum welding is a critical process in modern manufacturing and fabrication industries, offering unique challenges and opportunities for welders. By understanding the properties of aluminum, mastering welding techniques, and adhering to best practices, welders can produce high-quality aluminum welds suitable for a wide range of applications. As industries continue to demand lightweight, durable, and corrosion-resistant materials, the importance of aluminum welding in shaping our technological landscape will only continue to grow.